Sunday, May 27, 2012

Mason Jar Soap Dispenser

I found hundreds of these jars at a flea market in Judsonia, and was so excited because these old blue ones seem impossible to find. I've read several tutotials on how to make them, and they all did them a little differently.  I want to show you step by step how I made mine. You will need a mason jar, hammer, nail, pliers, a tall soap pump, and gorilla glue epoxy.

The first thing you'll do is take the lid off and make a hole using a hammer and nail.  Many people use a drill, but I have found the nail to be much easier and less messy.  

Some of the old mason jars have glass underneath, so after hammering through with your nail, you will need to pick out the glass piece by piece.  Afterwards, I make sure to wash the lid out with soap and water just to make sure all of the small glass pieces are gone.

Next, I got some needle nosed pliers and slowly pulled them apart to open the hole in my lid.  I opened until my soap pump fit snugly into the hole. 


I then turned over my lid, with the pump in place, and applied Gorilla Glue Epoxy.  Some people use hot glue, some use regular gorilla glue, and some use bathroom calk.  I really like Gorilla Glue Epoxy the best because it has a very strong hold, and it's not extremely messy. 

After applying the glue, I let the lid sit upside down on the counter for at least 4-5 hours.


And that's it!  Fairly simple to make and very inexpensive. 

I link to:
Classy Clutter, Boogie Board Cottage, Apron Thrift Girl, Our Delightful Home,  Hey What's For Dinner Mom?, It's Overflowing, Savvy Southern Style, DIY by Design, Fireflies and Jellybeans, Restore Interiors, Coastal Charm, Tip Junkie, Tatertots and Jello, Embracing Change, I Heart Naptime, Homemaker on a Dime, Serendipity and Spice, The Shabby Nest, Sassy Sites, Nap Time Crafters, C.R.A.F.T., Remodel aholic, Craftionary, House of Hepworths, Be Different Act Normal, Debbiedoo's, At the Picket Fence

Saturday, May 19, 2012

Living Room Makeover

Less than a year ago we moved from Arizona to Arkansas so my husband could attend Physician's Assistant school.  We moved from a very small condo to our first home and didn't have very much furniture, so I thought I'd try to fill my home by finding cheap things and fixing them up.  This dresser was my first experiment, and I had so much fun fixing it up. 


It started out pretty junky looking, but after some paint and new knobs it showed some improvement.  I decided to paint it white because I just wanted something simple for my living room that would go with everything.


I found this mirror for $5 at Goodwill.  I primed it, painted it, and glazed it with a black stain. 

 After finishing the mirror I painted some 8x10 frames, an 11x14 frame, and an oval frame.  I bought a wooden "W" at Wal-mart and modpodged some turquoise scrapbook paper to the front, and then painted the sides turquoise as well.

I put our family pictures in the other frames and arranged them all above my new dresser.

This is how it turned out after I was finished.  Now I have one less bare wall to look at!


I Link To:
(Check out some of these link parties for other great ideas)

Thursday, May 17, 2012

Pink and Gray Photo Holder

So I've had these spindles lying around, trying to figure out what to do with them. I thought that maybe it would be cute to use an old frame and glue it onto a spindle for a cute picture holder.  I used an old frame with the glass still in it, a spindle, scrapbook paper, a magnetic clip, and an oval base. 


First, I got my spindle and glued it to my oval base using wood gorilla glue ( this will need to be clamped or taped together, and will need time to dry). After allowing time to dry, I painted the base, spindle, and frame pink.   I then took the glass from my frame and mod podged a piece scrapbook paper to the front of the glass.  After letting everything dry, I sanded my frame to give it a distressed look, put the glass and the cardboard backing back into the frame.  I then used gorilla glue to fasten the spindle to the back of the frame, and allowed time to dry.  Last, i used gorilla glue to attach the magnetic clip to the front of the glass.  I really love how the pink and gray look together!


I Link to:

Thursday, May 3, 2012

Shabby Pink and White Dresser


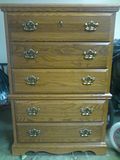
I found this dresser on craigslist for only $30. 

BEFORE

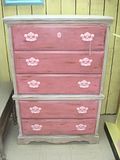
I did some light sanding and then painted the sides and top white. I then painted the drawers pink, removed the hardware, and painted it a lighter pink. After letting all of the paint dry, I brushed on some dark brown walnut stain and wiped it with a wet rag. As I wiped, some of the paint came off and gave it a distressed look. I finished by spraying everything with polycrylic.  Surprisingly the colors turned out quite nicely. 


 AFTER
PhotobucketPhotobucket


I link to:
Related Posts Plugin for WordPress, Blogger...