I recently bought a new orbital sander, which I love! Since I got it, I've been obsessed with sanding and staining everything. I found this old table for $40 at a garage sale and it sat in my garage for about 6 months taking up way too much space. Sometimes I buy things that I never get in the mood to paint, and this was one of those things. I finally got the motivation to do it, and I'm happy with how it turned out.
This is what I started with. I forgot to take a picture before I painted two of the chairs, but you get the idea of the ugliness of the table.
I started by sanding the entire surface down to the bare wood using my new Dewalt orbital sander. If you are trying to take the finish off completely, its best to use a very course sandpaper until everything comes off, and then use a fine grate to smooth it out. I used 60 to get it off, and then 200 to smooth it out afterwards. It probably took about an hour to sand it all down.
I then got some dark walnut stain
I used an old t-shirt, made it into a ball, and dipped it in my stain. (I really recommend using some gloves so the stain doesn't get all over your hands.) I rubbed the stain in sections back and forth across the table ( make sure to rub with the grain). I let each coat dry about 20 minutes before applying the next. After applying 3 coats, I was finished with my stain.
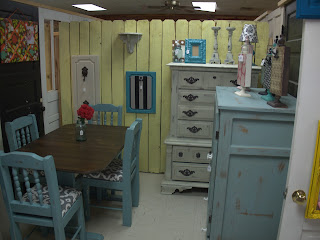
I then painted the bottom of my table using Valspar color Secluded Garden.
I thought this would look more turquoise than it did, but I really ended up loving the color.
I decided to use Polycrylic on the top for protection. Since it is a table that will get a lot of wear, I put 4 coats of this on top of the stained surface. Between coats it's best to sand the surface by hand with a very fine sandpaper.
The chairs were in pretty rough shape as you can see. After taking the fabric off, I realized that they were made with a piece of board and foam batting, which were not cut to fit the chair.
I took all of the seats off, and spray painted Rustoleum white primer on my chairs.
After letting it dry, I painted them using the same color as the bottom of my table. I did some distressing with medium grate sand paper and sprayed each chair with polyrcrylic spray paint for protection. I then had to cut the wood and batting to fit the chairs, and then attached the fabric with a staple gun.
This is how they looked when I finished. I really like the gray fabric with the paint color.
This would go perfectly in a small dining area or nook.
I link to these parties:
Chic on a Shoestring Decorating/,
Classy Clutter,
The Gingerbread Blog,
Funky Junk Interiors,
I Heart Naptime,
Miss Mustard Seed,
Finding Fabulous,
Five Days Five Ways,
Shabby Nest,
Fingerprints on the Fridge,
Craftionary

.jpg)

.jpg)


 "/>
"/>