Tuesday, July 31, 2012

Turquoise and White Striped Cabinet


 I found this cabinet on craigslist and had a hard time deciding what to do with it.  It sat in my garage for about 2 months before I finally got around to fixing it up. 

 BEFORE


Since turquoise happens to be one of my favorite colors, I decided to paint it turquoise and white.  I love how it turned out!
AFTER


I link to:


Tuesday, July 24, 2012

Yellow and Gray Chair Makeover


Redoing chairs is one of my favorite projects. 

I found this ugly old chair at a flea market for $15 and was excited to get home and see what I could do with it. 
 BEFORE


The first thing I did was unscrew the seat from the chair.  I spray painted white primer all over the entire thing. (This step is optional)

I then gave it two coats of mustard yellow

 After letting it dry about 20 minutes, I lightly distressed it with sandpaper.

I found this cute gray upholstery fabric at Hancock Fabrics and thought that it would go really good with the yellow!

I screwed my seat back on, and this is how it turned out! Very simple and inexpensive!
AFTER


I Link to these great parties:
Tip Junkie, A Diamond in the Stuff, Southern Lovely, Restore Interiors, DIY by Design, Embracing Change, The 36th Avenue, Chic on a Shoestring Decorating, At the Picket Fence, The Shabby Nest, Sassy Sites, Naptime Crafters, Craftionary, Miss Mustard Seed, Classy Clutter

Tuesday, July 17, 2012

DIY Scrapbook Paper Frame


A friend of mine taught me how to make these adorable frames!  They are super easy and fun to make. 

You will need a piece of 24" x 24" plywood (about 1/2 inch thick).  You will also need a minimum of 4 large pieces of scrapbook paper (12x12), a 11x13 frame, mod podge, paint, magnetic clip, wood glue, a door handle knob,a small thin piece of scrap wood, and letter stencils.


The first thing you will do is paint the back and sides of the board your desired color.  I decided to do black for mine.  While letting the paint dry, I got 4 large pieces of scrapbook paper and cut them each into 4 equal pieces so that you have 16 squares of paper. Next I layed my squares out on the board to make my pattern.  After laying my pieces out, I picked each one up one by one and applied the mod podge underneath the paper onto the board, and then placed the paper on top.  I then smoothed it out with my fingers until there were no bubbles.  I repeated until all squares were glued down.  I then applied a layer of mod podge over the top of the entire thing and let it dry.


I then painted my 11x13 frame black and attached it to my board using wood glue.  I also hammered nails through the back to fasten it more securely onto the board.  I then used wood glue to attach the magnetic clip.  I attached the door handle knob(from hobby lobby) by screwing it in through the back.


 And finally, i found a small piece of scrap wood, mod podged some scrapbook paper onto it, and stenciled the word family onto it. I glued it on my large piece of wood using gorilla wood glue. If you have a circuit machine, it would probably be easiest to just put vinyl letters straight onto your frame.


Now just add a cute picture, and you're done!  And it only cost about $15.

I link to these awesome parties:

Saturday, July 14, 2012

Stenciled Yellow and White table


Before
 I found this table while thrift shopping and thought it was pretty cute.

I've been loving mustard yellow lately, and found a color at lowes called Amber Wheat and decided to try it out.  I didn't do any sanding, but I did prime the entire thing white with valspar spray paint primer.  After priming, I put on two coats of my paint. 

 After letting my paint dry for about an hour, I stenciled all over the top using white paint. 

I think I will be using these colors in more of my projects!


 After
,
I Link to:

Friday, July 13, 2012

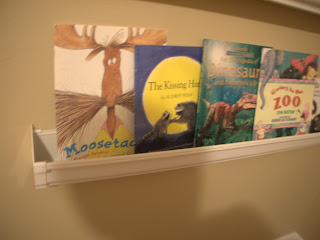
Rain Gutter Bookshelves


I got this cute idea from my mentor teacher when I student taught third grade several years back. I loved it, and decided to do the same thing in my son's room.

For materials, you will need 6 washers and 6 screws.

You also need 6 end caps and rain gutters (can purchase at any Home Depot or Lowes). 
\
When you purchase your rain gutters, they only come in large pieces. You will need to cut them using a hacksaw or backsaw to your desired length.  Mine are 34 inches long.

Decide generally where you want to put your first shelf.  You will need a studfinder to find a good place to put your screw. 

Once you find your stud, mark it and screw in one side of your rain gutter to the wall.  Use a level to make sure it's straight and fasten the other side to the wall.  Repeat the process for the other shelves and add end caps to each side. 

Such a cheap and easy way to display your books!

I Link to:

Friday, July 6, 2012

"His" and "Hers" King Headboard

I found this king size headboard for $15 at Goodwill. Such a deal! I'm bummed that I forgot to take before pictures.
I decided to paint it eggshell blue and distress it. I sell my furniture an adorable store called The Bees Knees.  I put this in the store, and it just sat there. The store owner had the idea to repaint it and put the words "His" and "Hers" at the top. Genuis idea! I went home, and decided to repaint the inside white and the rest black.  I stenciled the letters on with black paint.  Then I added a coat of black stain on top.  I wiped most of the stain off, let it all dry, and this is what I ended up with! 

I put in the store again, and this time it sold right away. I definetely spent some time on it since I had to repaint, but it was worth the effort. I love how it turned out!

I Link to:
Related Posts Plugin for WordPress, Blogger...